Expanding Expression Tool {Review}
 Graphics: Teaching in the Tongass
Disclaimer: Materials for this review were provided to me; however, all opinions expressed are my own.
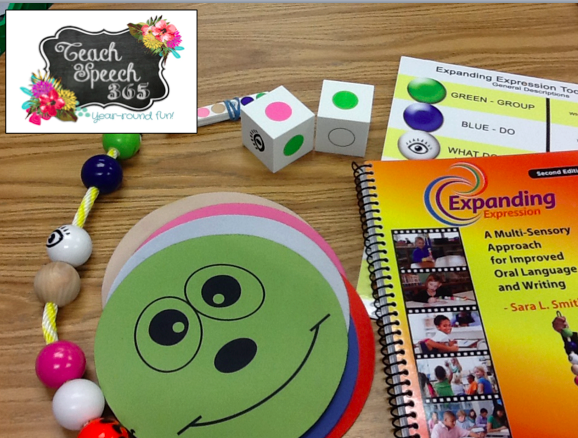
The Expanding Expression Tool (also known as EET) is a multi-sensory tool that improves oral and written language. It was created by Sara Smith who is a speech language pathologist. Ordering information can be found here. The kit comes with the following: the Expanding Expression tool, the manual, object cards, stickers for writing, a poster, 2 dice with the dots, and teacher icon cards. You can purchase the EETCHY Steppers as an add-on.
I was already a little familiar with the premise of the EET. I sat down to go through the manual and was excited to see that it not only targets describing, but you can also use it to target writing (from prior knowledge, biographies, summarizing)! How awesome is that?!
Several of my students already have describing goals on their IEPs. It is a way to improve overall language abilities, so it is often a goal I like to include. Baseline data was a must. Below are the answers I got when I asked my students to tell me everything they could about some items:
Student #1: 3rd grade
- Bell: “when you ring to wake up, sounds like a big noise, hook on it to hang it up” (3)
Student #2: 4th grade
- Book: “there’s words in it, it can be about things, has pictures” (3)
- Pencil: “tip can be sharp or not, can have an eraser, can have decorations” (3)
Student #3: 4th grade
- Soccer ball: “you can kick it, you play with it, you throw it” (3)
- Ice cream: “you lick it, it’s a dessert, it can be tall or small, it’s sweet” (4)
We had been using other methods to describe items (5 senses method: what does it look like, sound like, feel like, function, smell/taste like). I introduced the entire tool at once because these students are older and I felt they could handle it. The manual does a great job of breaking down each bead and provides tons of worksheets so that you can introduce the beads one by one if you choose. In general, my students were able to provide 2-3 solid details, but struggled to be specific.
I started to realize that they really struggled with the green bead – probably because they didn’t understand the concept of “group” or “category.” Because of this, I backed up and focused on this for a few lessons. The worksheets in the manual made that easy to do.
After just a few lessons, I asked the same students to describe the same items from the baseline. Here are the answers they gave:
Student #1: 3rd grade
- Bell: “makes a noise like dong dong, size is big, color is brown, made of metal, find it in a library or outside, it sounds loud” (6)
Student #2: 4th grade
- Book: “you turn the pages to read, mostly big/square/rectangle, any color, made of paper/trees, part on the side and pages, find it in a library, can have any title or illustrations” (6)
- Pencil: “for writing, you can write, orange/black/sharp/thin, made of wood, eraser/tip/body, find it in your pencil pouch, somebody might give it to you.” (7)
Student #3: 4th grade
- Soccer ball: “play with a ball, looks round and black and white, made of trees, find it in a store, you shoot it” (*made of = not correct, but she knew what the bead was) (5)
- Ice cream: “you lick it, you eat it, it’s pink/brown/white, 3 scoops, sweet, find it in the store, people sell it or in your home, it’s a flavor, it’s cold” (5)
Now they know to grab the EET because they know it will help them describe items. I haven’t yet moved into using it to focus on other types of print, but I’d love to try it with my students who are working on summarizing and higher language skills. I’ll swing back and do a post about that when I do!
What I Love:
-My students love being able to hold the tool, which I think helps them!
-They also love the EETCHY Steppers and it gets them up and moving
-It can be used to work on writing skills, which is an awesome way to incorporate curriculum into your therapy sessions
-The worksheets are broken down by bead and it’s easy to target one at a time or if you notice that your students have more difficulty with one of them
-I saw solid progress quickly. After a few weeks, I asked my students to describe the same items from the baseline and they were able to name at least 2 more details than they could at baseline. I expect this to continue until they are able to independently use the EET to describe items.
What I Would Love To See:
-There’s really nothing I would change about the EET. I’d love to attend one of Sara’s trainings, but I also feel like it is something you can implement from reading the manual.
Sara does full-day EET trainings for school districts! More information about the trainings she offers can be found here.
I will be adding more posts later on regarding how I’m using the EET, so be on the lookout for those!
Note: There are activities available on TPT that are advertised to be used with the EET. PLEASE check with Sara Smith ([email protected]) if you are interested in making/selling a product to make sure that it falls within copyright. The prompts and icons/symbols that she uses are copyrighted!!
Great post. Thanks for providing baseline and after examples. I have only been hearing positive things about EET. Lookin forward to following your students progress.
Thanks Anne! I’m very excited about the progress I’ve seen so far, in a relatively short amount of time! I’ll be doing follow up posts!
We’ve (the SLPs in my school system) written a grant for EET, but haven’t heard if we got it or not. I have a couple of kids that I work with that desperately need this! I’ve used the describing map from “Description Bingo” for years, but for some reason the kids have trouble visualizing the map.
Thank your for doing a review. It was great to see the before and after learning. I am hoping to order this with my budget before the end of this school year!
It is SUCH a great tool!!!
[…] couple weeks ago, I posted my first review of the EET. If you missed that, head here to read it! Sara was gracious enough to include the EETchy Steppers, which are quickly becoming a […]
[…] you are not familiar with the Expanding Expression Tool (EET), please read my review and follow up posts here. It is available from Sara Smith at her website. Today, I want to bring […]